Showing posts with label Cakes. Show all posts

Tuesday, March 6, 2012

Rachel's 2nd Birthday Cake

Pin It


My baby girl turned 2!!  Wow - the last two years have flown by and I still think of her as my baby.  But now I know I have to admit she isn't a baby anymore.  You would have thought I would have figured that out when she started climbing to the top of stools and stairs, but it takes me awhile.

We had a small family party for her and it was a Minnie Mouse theme.  I made the cake!  The bottom tier was eight inch chocolate.  I used Bakerella's Chocolate Cake recipe.  The top tier was a six inch Lemon Cake recipe I have used before.  Both were delicious!

After I baked my cakes, I let them cool and then level them and stack them.  Both were filled with buttercream.  On the chocolate cake I mixed in mini chocolate chips with the buttercream.  It was so good - reminded me of cookie dough!

After I stack them I make sure they are level.  I have a special level I only use in the kitchen.  Cheap at Lowe's - I think it was three dollars.  And it has a magnet and I just keep it on my fridge! 


Then I crumb coat them with buttercream frosting.  I used a new recipe that I got from my neighbor, Brenda.  It is not as sweet as the buttercream I usually use and I really liked it.  I will put the recipe below.

I made marshmallow fondant which I dyed white and pink.  I used Americolor hot pink for the pink.  And I used a Chocolate Marshmallow Fondant recipe I found for the black.  It was super easy to get really black and it tasted yummy!  I used the black fondant for the ears.  I cut the ears out using circle cutters.  Then I "glued" Popsicle sticks to the back of them with Karo Syrup.  Then inserted them into the top of the cake. 


 I used the same bow tutorial that I have used before and made my bow. Attached polka dots to bow and cake.  Lastly I used tip #12 to pipe dots around the border of my cakes. 


Done!  It was a little stressful because we had bad storms here, so Friday night before her party when I should have been working on the cake I was in the basement hiding out.  But we were lucky and no tornadoes.  Better safe than sorry.  Her party was a hit and she loved her cake.  So I am happy! 


Nanny Burke's Buttercream (not sure where it came from!)
-1 1/2 cups of salted butter
-1/2 cup Crisco
-1lb confectioner sugar
-1tsp vanilla

1.  Cream the butter and Crisco together until smooth.
2.  Add vanilla and confectioners sugar and mix until combined.

This post may be shared with: Flour Me With Love - Mix It Up Monday, Alderberry Hill - Make The Scene Monday, Make Ahead Meals for Busy Moms - Melt in Your Mouth Monday, Clairejustineoxox - Creative Mondays, Skip To My Lou - Made by You Monday, Sweetology - Tea Party Tuesday, Crazy for Crust - Crazy Sweet Tuesday, Uncommon - Uncommonly Yours, Mandy's Recipe Box - Totally Tasty Tuesdays, Reason To Skip The Housework - Tuesday Timeout, Inside Bru Crew Life - Trick or Treat Tuesday, Mrs Fox's Sweets - Sweet Party, Made Famous By - Famous Linkz Party, Junk In Their Trunk - Link It Up Wednesday, The Kings Court 4 - What's Cooking Wednesday, Hugs and Cookies XO - Wonka Wednesday, Food Corner - Midweek Fiesta, Something Swanky - Sweet Treat Thursday, These Peas Taste Funny - Link It Up Thursday, Talking Dollars and Cents - Sweet Temptations, Happy Hour Projects - Freestyle Friday, Tidy Mom - I'm Lovin' It Friday, Susie QT Pies - Happy Friday Link Up, Kitchen Fun With My 3 Sons - Kitchen Fun and Crafty Friday Link Party, Dwell On Joy - Dwell On Friday, Toys In The Dryer - Fun Stuff Fridays, Alli-n-Son - Sweet Tooth Friday, Crumbs and Chaos - Seasonal Inspiration, The Country Cook - Weekend Potluck, Mama Mias Heart 2 Heart - Sharing Saturday, Sweet As Sugar Cookies - Sweets for a Saturday, Randee's Organized Chaos - Sleepy Sunday, Country Momma Cooks - Saturday Link & Greet, Well Seasoned Life - Sweet Indulgences Sunday, Bacon Time With The Hungry Hypo - Crafting Cooking From The Heart Contest, Southern Mom Cooks - Valentine Party, Cupcake Apothecary - A Themed Baker's Sunday, Addicted To Recipes - Scrumptious Sunday Link Party

Tuesday, January 17, 2012

Pink Ruffle Cake

Pin It


First let me say that my picture taking skills leave a lot to be desired......  Someday when I have the time (aka - never) I will learn more and maybe buy a better camera.  But for now this is all I got!!

I have seen ruffle cakes all over the Internet and on facebook and I really wanted to try one.  This is an experiment after all and if I only bake and decorate what I know, then what's the point.  So a pink ruffle cake it is!!

I baked a six inch chocolate cake and made vanilla buttercream.  I colored my frosting pink with Wilton Gel.  I wasn't sure how much frosting I would need.  This technique uses a lot of frosting so I doubled my recipe and it was just enough.  I had only a small amount leftover.

After my cake was baked and cooled I crumb coated it.  I filled a disposable piping bag with my icing fitted with tip 104.  Now I started my ruffles.  You need to frost the ruffle columns with the wide part of the tip closest to the cake.  I tried to make my columns all the same width.  Start piping frosting and then go back and forth to get the ruffle effect.  Keep completing columns until you have gone around the entire cake.


I had to be careful to make sure I kept my columns the same width, that they went straight up and down (some are a little curvy) and that I kept them close together.   I didn't want to see any cake in between my columns.  The crumb coating helped with this too.  When I got to the top I started at the outside and did ruffles around and around until it was covered.


I think this decorating technique looks great and actually wasn't that hard.  It would be perfect for a shower or birthday cake.  Another one on my list of "can do's!"


Saturday, December 3, 2011

Lemon Tool Birthday Cake

My husband, Rob's, birthday was November 27th.  I wanted to make him a really special cake.  Unlike me his favorite thing is not chocolate (hard to believe we ended up together!)  He does like chocolate but not his favorite.  When I asked him what flavor he wanted for his birthday cake he said lemon cake and lemon frosting.  Now I like lemon, but I wanted a cake that everyone could enjoy (like me and my chocoholic father!).  So we settled on lemon cake with vanilla buttercream frosting.  I didn't want to cover the cake in fondant because that really isn't his favorite.  So I frosted it in buttercream (recipe is below), smoothed the buttercream and did the border and decorations in fondant.  I honestly think that using fondant to cover a cake is easier than smoothing buttercream.  It is so hard to get it to look smooth and perfect.  Something I definately need a lot more practice at!

I searched on Cake Central for a lemon cake recipe.  I found one by TasteandSeeCakesAZ (modified recipe below).  I baked the cake and leveled it.  We tasted the cake that we had to trim off and it was excellent.  So I frosted it with buttercream.  I rolled out a yellow piece of fondant and cut it into a 1"thick strip.  I then used my black edible marker from Americolor to draw on the tape measure. 


I also have a tool candy mold so I colored fondant and pushed it into the mold to make tools for the top of the cake.  Only problem I had is that I had to make and eat the cake in one day.  The fondant tools could have really used more time to dry out and harden. 


I have also heard that gumpaste would be good for this type of decoration.  But I don't know anything about that yet.  I need to add it to my list of future experiments.  Other problem with doing the cake in one day is that I had to take the pictures at night when it was finished and with no natural light.  So bear with me :)

The cake came out ok and Rob loved the lemon flavor.  Very suprisingly so did my Dad!!!   I really wanted this cake to be spectacular since it was for Rob's birthday.  At first it was going to be a tool box cake, then a cake in the shape of a drill.  I really just ran out of time.  It was so hectic here.  I did learn a very important lesson though and that was to leave myself enough time and to plan out your cake.  Believe me, having a plan is essential and will save you a lot of stress!


Buttercream

2 sticks (1 Cup) plus 4 tablespoons butter, softened.  I use unsalted butter.
4 cups powdered sugar
2 teaspoons vanilla extract
4 teaspoons hot water

-Beat butter and sugar with an electric mixer until smooth.
-Add vanilla and hot water and beat again until smooth.

Makes enough to cover 24 cupcakes or one cake.

Lemon Cake

1 1/2 cup sugar
1 stick (1/2 cup) butter
1 box (3.4 oz) instant lemon pudding
1 teaspoon lemon extract
2 teaspoons vanilla extract
1 cup sour cream (8 oz)
zest of 1 lemon
4 eggs
2 cups all purpose flour
2 teaspoons baking powder
1/4 teaspoon salt (optional)
3/4 cup whole milk

-Cream butter and sugar in electric mixer on medium high until smooth.
-Add pudding, lemon and vanilla extracts, lemon zest and sour cream and combine.
-Beat in eggs one at a time.
-In a separate bowl combine remaining dry ingredients.
-Alternate adding dry ingredients and milk a little at a time until all is combined.
-Bake in greased cake pan at 350 degrees until done, about 30 minutes.
-Cool in pan for 10 minutes.  Finish cooling on drying rack.  Frost when completely cool.

Tuesday, November 22, 2011

Hudson's Birthday Snake Cake!


My friend's son, Hudson, wanted a snake cake for his birthday.  His request?  That it be blue and orange and the insides be red like blood.  Sounds fun!  Although I was a little nervous.  I bake for myself and family but never for anyone else.  This is so important - HUDSON'S BIRTHDAY CAKE.  Take a deep breath!!!

I started by baking two vanilla bundt cakes.  I used a whole bottle of red gel food coloring and the cakes still weren't as red as I would have liked.  But red enough, next time I will get more food coloring!  I used a cake tester to make sure the cakes were done.  When the tester comes out clean the cake is done.


Then I  cut the cake into halfs and carved out the snake head and tail using a serrated knife.


I frosted the snake in buttercream frosting.  I "glued" the pieces of snake together with buttercream and also put buttercream on the bottom of the snake so he would stick to the cake board.  I wanted to make sure he didn't move! 


I used a tip #10 to pipe dots all over the snake.  Once the buttercream hardened I used my finger to smooth the dots and give it a more scale like look.  Two yellow M&Ms for the eyes.  I used an Americolor edible pen to draw in pupils.  His tongue was a piece of red licorice carved by my husband!  Our snake made it to the party in once piece and I think he was a big hit!


Shared With:

Tuesday, November 8, 2011

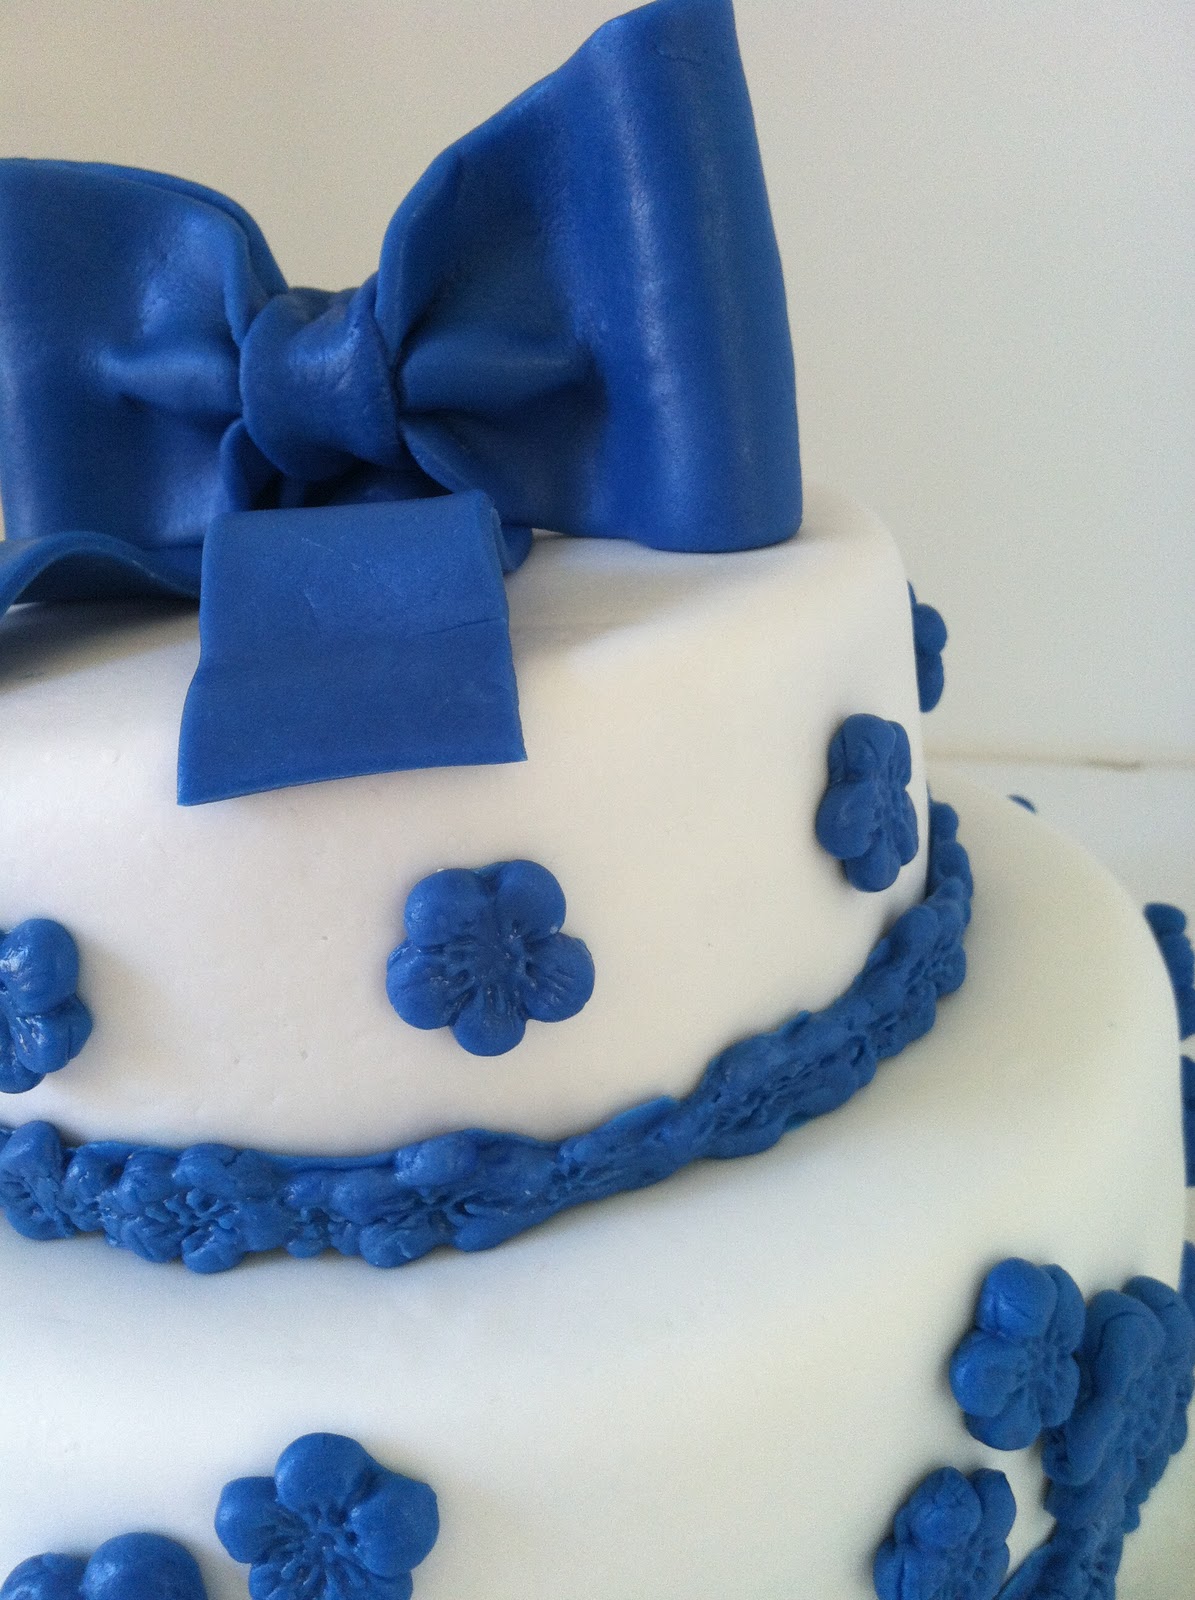
Blue Flower Cake


Everyone keeps asking me why?  Why did you make this cake?  What is the occasion?  Well my answer dissapoints!  There is no reason why, no occasion.  I just really wanted to try my hand at a tiered cake - something I have never done before.  So I decided to make a two tier fondant cake with fondant decorations. 

I started by making two batches of  marshmallow fondant.  I made an eight inch chocolate cake from scratch and a six inch vanilla Duncan Hines cake.  Originally I wanted this entire cake to be from scratch but at 11pm Saturday night I decided I didn't like my vanilla cake recipe and grabbed the good old Duncan Hines.  I feel a little guilty about that - but not that much.  Duncan Hines is good cake and everyone likes it - so what the heck!  As soon as the cakes were cooled I did a crumb coat of frosting.  Then onto the fondant.

I dusted my counter with powdered sugar and rolled out my white fondant.  I bought dusting pouches at Michael's and I think they are totally worth it.  I used a lot less powdered sugar for dusting than I would have if I didn't have the pouch - a lot less mess too!  I rolled out a HUGE piece of fondant.  I was worried it wouldn't be big enough to cover the cake.


As you can see I had way more than enough!  I think to get better at working with fondant it really is a lot of practice.  Next time I won't roll out quite as much!!  After both tiers of the cake were covered in fondant I needed to put support in the bottom tier to hold up the top tier.  I used colored straws.  They are cheaper than wooden dowels, I think easier to work with, and you can really see them in the cake so no accidental eating.  I put one straw in the cake, measured and cut it and then used it to measure the other straws.  Then stacked the cakes.


Now to decorate!  I wasn't worried that you could see the seam between the two layers because I knew I was going to put a fondant border there.  I used the Wilton Nature Fondant Mold to mold my fondant.  It was a lot easier to use than I thought.  I made sure to dust with powdered sugar before I put my fondant in and then just pulled out the fondant.


I brushed the back of the molded fondant with a little bit of water and then stuck them to the cake.  For a cake topper I decided I wanted a fondant bow.  I found a great tutorial on youtube by the Royal Bakery.  She gave such great instruction.  Of course my computer is in the office - so I started the video watched the first step hit pause, ran to the kitchen did first step, run to office......and so on until I was done.  (Hoping to burn some calories so I can eat more cake!)


I attached the bow to the cake - really by just balancing it on top.  I used wooden spoons to balance it on the top of the cake and pushed it in a little.  It seemed to be ok.  So now I have this completed cake and what do I do with it?  I invited some neighbors over for cake!  Better than eating it myself which is what might happen if it stayed here :).

This was definately a learning experience.  But I really enjoyed it!  It did take a lot of time and next time I know I would be a little smarter on how I scheduled all of the steps.  Maybe get a babysitter for the whole weekend :)  Here are some more pictures - hope you enjoy!


Join me for a  Tea Party!  I shared this cake on Sweetology's blog.  Go check it out - her cupcakes are amazing!

Monday, October 17, 2011

Dad's 75th Golf Birthday Cake


My Dad loves to golf!  For his 75th birthday I decided I would make him a golf cake.  There are so many great ideas out there.  I wanted the cake to look like a golf green.  I baked a double layer chocolate cake with rich buttercream frosting as the filling.  Dad loves chocolate so it is a perfect filler for him!The rich chocolate buttercream recipe is from The Ultimate Southern Living Cookbook.  It is very rich and should be classed as a dessert all by itself - it is so yummy!  I have the recipe at the end of this post.

I made a double batch of buttercream frosting and colored it green.  I used wilton green, wilton blue and americolor forest green.  Getting the green I wanted was probably the hardest part.  I kept adding more and more coloring.  The frosting was looking very minty so I added some blue which made it darker like I imagined a golf course would look.

I frosted the entire cake in the buttercream.  Drew outlines for my golf green, water hazard and sand trap.  The rest of the top of the cake I frosted using tip 233 to make it look like grass.  I liked doing this because it hid the buttercream and so that didn't have to be completely smooth.

I wanted the cake to have a water hazard and sand trap.  For the water hazard I used piping gel.  I colored it blue and frosted underneath it with white so the blue would show thru.  Looking at it now I wish I had made it a darker blue - maybe next time.  I used my mortar and pestle to crush graham crackers to use for the sand trap.  I had to travel with the cake and I didn't add the graham crackers until we got to our destination.  I didn't want them to soak into the buttercream.

I also have somewhat of a scrapbooking addiction and I used my Cricut machine to cut out the flag and 75 for the golf flag.  I used a wooden dowl for the flag pole and voila - I was done!!  I think Dad enjoyed it :)


Rich Chocolate Buttercream

2 (1 Ounce) squares unsweetened chocolate
2 (1 Ounce) squares semisweet chocolate
1 cup butter, softened
4 cups powdered sugar
1/4 cup cocoa
1/4 cup milk
2 teaspoons vanilla extract


- Melt chocolate
- Beat Butter at medium speed with an electric mixer until creamy.  Add chocolate, powdered sugar, and remaining ingredients.  Beat until spreading consistency.

    Thursday, September 29, 2011

    One Giant Cupcake

    What to do, what to do?  I could do laundry - nope.  I could clean anything - nope.  I want to bake!  So this week I decided to make a giant cupcake.  I used the Wilton Giant Cupcake Pan.  My first step was to make the lining for the giant cupcake.  I have seen so many pictures online of beautiful smooth liners and wasn't sure how to do it.  I found instructions to use candy melts on the Oh, Sugar Cakes blog (www.ohsugarcakes.blogspot.com).  I tried it and it worked better than I could have expected!

    First step was to gather supplies, and melt the chocolate.  I chose purple - I have been really liking purple lately!


    I melted half of the candy melts in the microwave, poured them in the bottom of the giant cupcake pan and used a mini spatula to spread the melted candy up the sides of the liner.  Then I chilled it for at least 20 minutes and repeated the process with the remaining candy melts. 


    I had read online people had trouble getting the candy liner out of the pan so I made sure to leave it in the fridge for a long time.  I think I left it in there for 40 minutes.  When it was ready to come out I was so nervous.  I made my husband come with me - but it was no problem!  The candy liner popped right out and it looked great!


    I then baked the giant cupcake.  The pan is one piece and the bottom of the cupcake is quite a bit larger than the top so I baked the bottom and then baked the top separately so I wouldn't overbake the top.  I trimmed the bottom of the cupcake so that it would fit into my candy liner.  Then I frosted it and gently dropped it into the liner.  I leveled both pieces of the cake and the put the top on the cupcake.


    I decorated the top with buttercream frosting.  I wanted a lighter pink frosting, but it was getting late and I put a lot of gel color in the frosting so you can see it came out bright pink.  Note to self - it is true to put a little color in at a time until you get the color you want!!   I used the Wilton 2D tip.  The top took a lot of frosting and I would have used more on the top but I ran out.  Next time I think I will try something different on the top because I am not a huge fan of how it looks.  I think the next time will come sooner than later because I really love this cake and had fun making it!