Showing posts with label Fondant. Show all posts

Tuesday, March 6, 2012

Rachel's 2nd Birthday Cake

Pin It


My baby girl turned 2!!  Wow - the last two years have flown by and I still think of her as my baby.  But now I know I have to admit she isn't a baby anymore.  You would have thought I would have figured that out when she started climbing to the top of stools and stairs, but it takes me awhile.

We had a small family party for her and it was a Minnie Mouse theme.  I made the cake!  The bottom tier was eight inch chocolate.  I used Bakerella's Chocolate Cake recipe.  The top tier was a six inch Lemon Cake recipe I have used before.  Both were delicious!

After I baked my cakes, I let them cool and then level them and stack them.  Both were filled with buttercream.  On the chocolate cake I mixed in mini chocolate chips with the buttercream.  It was so good - reminded me of cookie dough!

After I stack them I make sure they are level.  I have a special level I only use in the kitchen.  Cheap at Lowe's - I think it was three dollars.  And it has a magnet and I just keep it on my fridge! 


Then I crumb coat them with buttercream frosting.  I used a new recipe that I got from my neighbor, Brenda.  It is not as sweet as the buttercream I usually use and I really liked it.  I will put the recipe below.

I made marshmallow fondant which I dyed white and pink.  I used Americolor hot pink for the pink.  And I used a Chocolate Marshmallow Fondant recipe I found for the black.  It was super easy to get really black and it tasted yummy!  I used the black fondant for the ears.  I cut the ears out using circle cutters.  Then I "glued" Popsicle sticks to the back of them with Karo Syrup.  Then inserted them into the top of the cake. 


 I used the same bow tutorial that I have used before and made my bow. Attached polka dots to bow and cake.  Lastly I used tip #12 to pipe dots around the border of my cakes. 


Done!  It was a little stressful because we had bad storms here, so Friday night before her party when I should have been working on the cake I was in the basement hiding out.  But we were lucky and no tornadoes.  Better safe than sorry.  Her party was a hit and she loved her cake.  So I am happy! 


Nanny Burke's Buttercream (not sure where it came from!)
-1 1/2 cups of salted butter
-1/2 cup Crisco
-1lb confectioner sugar
-1tsp vanilla

1.  Cream the butter and Crisco together until smooth.
2.  Add vanilla and confectioners sugar and mix until combined.

This post may be shared with: Flour Me With Love - Mix It Up Monday, Alderberry Hill - Make The Scene Monday, Make Ahead Meals for Busy Moms - Melt in Your Mouth Monday, Clairejustineoxox - Creative Mondays, Skip To My Lou - Made by You Monday, Sweetology - Tea Party Tuesday, Crazy for Crust - Crazy Sweet Tuesday, Uncommon - Uncommonly Yours, Mandy's Recipe Box - Totally Tasty Tuesdays, Reason To Skip The Housework - Tuesday Timeout, Inside Bru Crew Life - Trick or Treat Tuesday, Mrs Fox's Sweets - Sweet Party, Made Famous By - Famous Linkz Party, Junk In Their Trunk - Link It Up Wednesday, The Kings Court 4 - What's Cooking Wednesday, Hugs and Cookies XO - Wonka Wednesday, Food Corner - Midweek Fiesta, Something Swanky - Sweet Treat Thursday, These Peas Taste Funny - Link It Up Thursday, Talking Dollars and Cents - Sweet Temptations, Happy Hour Projects - Freestyle Friday, Tidy Mom - I'm Lovin' It Friday, Susie QT Pies - Happy Friday Link Up, Kitchen Fun With My 3 Sons - Kitchen Fun and Crafty Friday Link Party, Dwell On Joy - Dwell On Friday, Toys In The Dryer - Fun Stuff Fridays, Alli-n-Son - Sweet Tooth Friday, Crumbs and Chaos - Seasonal Inspiration, The Country Cook - Weekend Potluck, Mama Mias Heart 2 Heart - Sharing Saturday, Sweet As Sugar Cookies - Sweets for a Saturday, Randee's Organized Chaos - Sleepy Sunday, Country Momma Cooks - Saturday Link & Greet, Well Seasoned Life - Sweet Indulgences Sunday, Bacon Time With The Hungry Hypo - Crafting Cooking From The Heart Contest, Southern Mom Cooks - Valentine Party, Cupcake Apothecary - A Themed Baker's Sunday, Addicted To Recipes - Scrumptious Sunday Link Party

Saturday, December 3, 2011

Lemon Tool Birthday Cake

My husband, Rob's, birthday was November 27th.  I wanted to make him a really special cake.  Unlike me his favorite thing is not chocolate (hard to believe we ended up together!)  He does like chocolate but not his favorite.  When I asked him what flavor he wanted for his birthday cake he said lemon cake and lemon frosting.  Now I like lemon, but I wanted a cake that everyone could enjoy (like me and my chocoholic father!).  So we settled on lemon cake with vanilla buttercream frosting.  I didn't want to cover the cake in fondant because that really isn't his favorite.  So I frosted it in buttercream (recipe is below), smoothed the buttercream and did the border and decorations in fondant.  I honestly think that using fondant to cover a cake is easier than smoothing buttercream.  It is so hard to get it to look smooth and perfect.  Something I definately need a lot more practice at!

I searched on Cake Central for a lemon cake recipe.  I found one by TasteandSeeCakesAZ (modified recipe below).  I baked the cake and leveled it.  We tasted the cake that we had to trim off and it was excellent.  So I frosted it with buttercream.  I rolled out a yellow piece of fondant and cut it into a 1"thick strip.  I then used my black edible marker from Americolor to draw on the tape measure. 


I also have a tool candy mold so I colored fondant and pushed it into the mold to make tools for the top of the cake.  Only problem I had is that I had to make and eat the cake in one day.  The fondant tools could have really used more time to dry out and harden. 


I have also heard that gumpaste would be good for this type of decoration.  But I don't know anything about that yet.  I need to add it to my list of future experiments.  Other problem with doing the cake in one day is that I had to take the pictures at night when it was finished and with no natural light.  So bear with me :)

The cake came out ok and Rob loved the lemon flavor.  Very suprisingly so did my Dad!!!   I really wanted this cake to be spectacular since it was for Rob's birthday.  At first it was going to be a tool box cake, then a cake in the shape of a drill.  I really just ran out of time.  It was so hectic here.  I did learn a very important lesson though and that was to leave myself enough time and to plan out your cake.  Believe me, having a plan is essential and will save you a lot of stress!


Buttercream

2 sticks (1 Cup) plus 4 tablespoons butter, softened.  I use unsalted butter.
4 cups powdered sugar
2 teaspoons vanilla extract
4 teaspoons hot water

-Beat butter and sugar with an electric mixer until smooth.
-Add vanilla and hot water and beat again until smooth.

Makes enough to cover 24 cupcakes or one cake.

Lemon Cake

1 1/2 cup sugar
1 stick (1/2 cup) butter
1 box (3.4 oz) instant lemon pudding
1 teaspoon lemon extract
2 teaspoons vanilla extract
1 cup sour cream (8 oz)
zest of 1 lemon
4 eggs
2 cups all purpose flour
2 teaspoons baking powder
1/4 teaspoon salt (optional)
3/4 cup whole milk

-Cream butter and sugar in electric mixer on medium high until smooth.
-Add pudding, lemon and vanilla extracts, lemon zest and sour cream and combine.
-Beat in eggs one at a time.
-In a separate bowl combine remaining dry ingredients.
-Alternate adding dry ingredients and milk a little at a time until all is combined.
-Bake in greased cake pan at 350 degrees until done, about 30 minutes.
-Cool in pan for 10 minutes.  Finish cooling on drying rack.  Frost when completely cool.

Tuesday, November 8, 2011

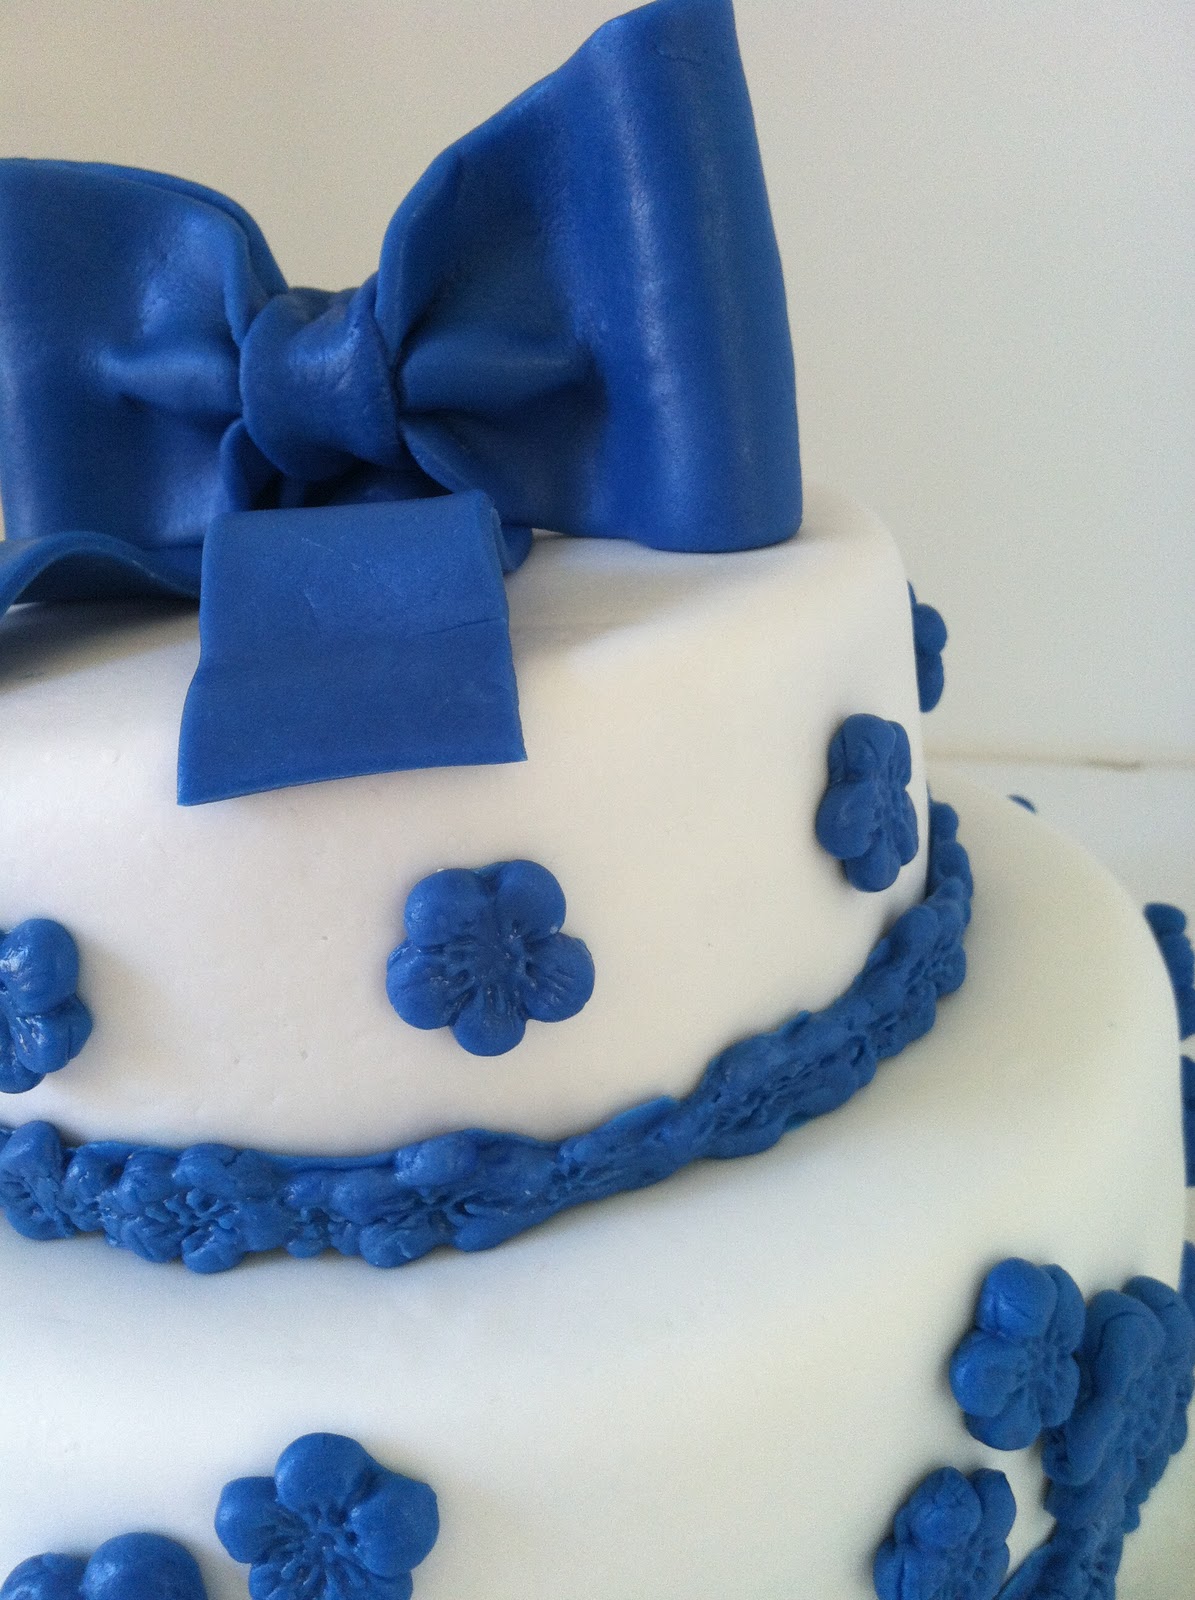
Blue Flower Cake


Everyone keeps asking me why?  Why did you make this cake?  What is the occasion?  Well my answer dissapoints!  There is no reason why, no occasion.  I just really wanted to try my hand at a tiered cake - something I have never done before.  So I decided to make a two tier fondant cake with fondant decorations. 

I started by making two batches of  marshmallow fondant.  I made an eight inch chocolate cake from scratch and a six inch vanilla Duncan Hines cake.  Originally I wanted this entire cake to be from scratch but at 11pm Saturday night I decided I didn't like my vanilla cake recipe and grabbed the good old Duncan Hines.  I feel a little guilty about that - but not that much.  Duncan Hines is good cake and everyone likes it - so what the heck!  As soon as the cakes were cooled I did a crumb coat of frosting.  Then onto the fondant.

I dusted my counter with powdered sugar and rolled out my white fondant.  I bought dusting pouches at Michael's and I think they are totally worth it.  I used a lot less powdered sugar for dusting than I would have if I didn't have the pouch - a lot less mess too!  I rolled out a HUGE piece of fondant.  I was worried it wouldn't be big enough to cover the cake.


As you can see I had way more than enough!  I think to get better at working with fondant it really is a lot of practice.  Next time I won't roll out quite as much!!  After both tiers of the cake were covered in fondant I needed to put support in the bottom tier to hold up the top tier.  I used colored straws.  They are cheaper than wooden dowels, I think easier to work with, and you can really see them in the cake so no accidental eating.  I put one straw in the cake, measured and cut it and then used it to measure the other straws.  Then stacked the cakes.


Now to decorate!  I wasn't worried that you could see the seam between the two layers because I knew I was going to put a fondant border there.  I used the Wilton Nature Fondant Mold to mold my fondant.  It was a lot easier to use than I thought.  I made sure to dust with powdered sugar before I put my fondant in and then just pulled out the fondant.


I brushed the back of the molded fondant with a little bit of water and then stuck them to the cake.  For a cake topper I decided I wanted a fondant bow.  I found a great tutorial on youtube by the Royal Bakery.  She gave such great instruction.  Of course my computer is in the office - so I started the video watched the first step hit pause, ran to the kitchen did first step, run to office......and so on until I was done.  (Hoping to burn some calories so I can eat more cake!)


I attached the bow to the cake - really by just balancing it on top.  I used wooden spoons to balance it on the top of the cake and pushed it in a little.  It seemed to be ok.  So now I have this completed cake and what do I do with it?  I invited some neighbors over for cake!  Better than eating it myself which is what might happen if it stayed here :).

This was definately a learning experience.  But I really enjoyed it!  It did take a lot of time and next time I know I would be a little smarter on how I scheduled all of the steps.  Maybe get a babysitter for the whole weekend :)  Here are some more pictures - hope you enjoy!


Join me for a  Tea Party!  I shared this cake on Sweetology's blog.  Go check it out - her cupcakes are amazing!

Sunday, September 25, 2011

Anniversary Cupcakes

I have a great group of friends from my old neighborhood.  It really is amazing that we all moved in so close to each other at the same time and became such good friends.  Ten years, four marriages and six kids later we decided to have a party to celebrate!  I made cupcakes for the occasion.  I frosted all of the cupcakes with buttercream and then applied fondant in different designs.  I used homemade Marshmallow Fondant.   For the adults I put a "10" on the cupcakes to commemorate the anniversary, for the girls I did cute pink piggies and for the boys brown sheep.  I got the idea from Joanna Farrow's book Cupcakes.  They were cute, but the sheep look a little weird I think!  Next time I need to work on those and possibly some other animals.  Maybe for one of my kids birthdays I will have a barn party and make the cupcakes - or maybe order from Publix :).  Just kidding - I am almost ready to vow to never buy a cake again - almost!  Here are some pictures:


I bought cupcake liners on-line that keep their color better after being baked.  Can you tell - the blue color of the liner still looks pretty good.  You have to look for cupcake liners that say "grease-proof".

Sunday, September 18, 2011

My First Fondant Cake!

I decided to experiment with fondant.  How hard can it be right?  I heard that the homemade marshmallow fondant was much cheaper to use and tasted better than regular fondant so I decided to see what all the fuss was about.  I used a standard marshmallow fondant recipe I found online:

16 oz marshmallows
2lbs confection sugar
2 Tbsp water
2 Tsp vanilla

Making the fondant wasn't as hard as I thought but it was VERY sticky!!  My advice to anyone would be to grease everything that will touch the fondant with Crisco - a lot of Crisco!  So I made my fondant, baked a square cake and decided to cover it with my fondant. 

I colored my fondant green.  It came out kind of tye dyed because my fondant wasn't warm enough when I was mixing the color in (I think?!)  When I colored more fondant blue I made sure the fondant was warmer and it was much easier to color.  But I think the tye dye looked pretty cool.